


Choose an option to see quick actions and get help faster.
.svg)
Why Knowing How to Check and Replace Your AC Air Filter Protects Comfort
Knowing how to check and replace your ac air filter is one of the simplest ways to protect your home's comfort, airflow, and indoor air quality. A clogged filter forces your system to work harder, while regular filter checks help your AC run more efficiently.
Here is a quick overview of how to do it:
1. Turn off your HVAC system at the thermostat before touching the filter.
2. Find the filter compartment - usually at a return air grille on a wall or ceiling, or inside your air handler cabinet.
3. Remove the old filter and check it for dust buildup, damage, or moisture.
4. Insert the new filter with the airflow arrow pointing toward the blower motor.
5. Close the panel, restart the system, and set a reminder to check again next month.
Most homeowners can complete this in under five minutes. The U.S. Department of Energy recommends checking your filter once a month and replacing it at least every three months.
For Central Virginia homeowners, hot and humid summers mean your AC runs hard from spring through fall. That extra runtime loads up filters faster than you might expect, making regular checks especially important.
The sections below walk through each step, explain how to choose the right filter, and cover the signs that tell you it is time for a change.

How to Check and Replace Your AC Air Filter: What to Know Before You Start
Before grabbing a new filter, it helps to understand what this simple piece of pleated material does. Many homeowners think the filter only cleans the air you breathe. It does help indoor air quality, but its main job is to protect your HVAC system.
When your air conditioner runs, the blower motor pulls warm air from your home through the return ducts. That air carries dust, pollen, pet dander, mold spores, and fibers. Without a filter, those particles can coat the evaporator coil and blower components. Dust on the coil acts like insulation, making it harder for the refrigerant inside to absorb heat.
As buildup increases, airflow drops and the blower motor has to work harder. This can lead to comfort problems, extra wear on system parts, and reduced cooling performance. To learn more, read our guide on How Dirty Air Filters Destroy Your AC Performance.
Where Is the AC Air Filter Located?
Finding your AC filter can feel like a small treasure hunt because HVAC layouts vary by home age and design.
In Central Virginia, you will typically find your filter in one of these locations:
• The Return Air Grille (Wall or Ceiling): Many homes have the filter behind a large metal return air vent in a hallway, wall, or ceiling. These grilles usually have simple latches.
• The Indoor Air Handler or Furnace Cabinet: If your system is in a basement, utility closet, garage, or attic, the filter may sit in a slot where the return duct meets the blower compartment.
• Multiple Return Grilles: Larger or multi-story homes may have more than one return vent, each with its own filter. Check and replace all of them together.
• Window AC Units and Ductless Mini-Splits: These filters are usually washable plastic mesh screens located behind the front intake panel.
Where to Start With How to Check and Replace Your AC Air Filter
First, turn off your system at the thermostat. This prevents the AC from pulling loose dust or debris into the blower while the filter is removed.
Next, find the access panel and look for the airflow arrow on the old filter frame before removing it. A helpful tip is to draw an arrow on the metal cabinet or grille with a permanent marker so the correct airflow direction is easy to see next time.
The filter should slide in smoothly without bending and should not leave large gaps around the edges. Gaps allow unfiltered air to bypass the filter. Keep a few spare filters near your indoor unit so monthly checks are quick.
How Often Should You Check or Replace It?
The general rule is to check the filter monthly and replace standard filters at least every 90 days, but your schedule depends on filter type, household conditions, and AC runtime.
• Basic 1-Inch Fiberglass Filters: Check monthly and replace about every 30 days.
• Standard 1-Inch to 2-Inch Pleated Filters: These usually last 60 to 90 days in average households.
• Thick 4-Inch to 5-Inch Media Filters: These may last 6 months to a year, but should still be inspected regularly.
Pets, allergies, smokers, and remodeling dust can shorten these timelines. In Central Virginia, humid summer weather often keeps air conditioners running for long stretches, which can also load filters faster. To help prepare your cooling system for local summer conditions, check out our AC Tune-Up Guide for Central Virginia Homeowners.
Step-by-Step: Replace Your AC Filter Safely in 5 Minutes
Replacing your AC filter is quick, and a few basic supplies make it easier:
• A replacement filter of the correct size
• A flashlight
• A permanent marker
• A trash bag
• A step stool or ladder, if needed
• A screwdriver, if your grille or panel uses screws
• Optional: gloves and a dust mask for allergies or asthma
If you want to review other homeowner-friendly checks to perform alongside your filter inspection, see our AC Troubleshooting Tips Before Calling a Pro.
Safety Notes for How to Check and Replace Your AC Air Filter
Changing a filter is simple, but these safety steps help prevent problems:
• Never work on an active system: Turn the thermostat to "Off." If working inside the air handler cabinet, you can also use the local safety switch or breaker.
• Keep hands dry: Make sure your hands are dry before touching switches or metal panels.
• Use a secure ladder: Do not stand on chairs or unstable furniture to reach ceiling grilles.
• Watch for sharp edges: Be careful around metal cabinets and return grilles.
• Handle mold carefully: If the filter is damp or has black spots, wear gloves, bag it right away, and avoid breathing in debris.
• Never run the system empty: Do not turn the AC back on while the filter slot is open or empty.
Step 1: Turn Off the HVAC System
Go to the thermostat and switch the system from "Cool" or "Heat" to "Off."
Also make sure the fan is set to "Auto," not "On." If the fan is set to "On," the blower may keep running. Turning the system fully off keeps unfiltered air and loose dust from being pulled into the ductwork.
Step 2: Find and Open the Filter Compartment
Use your flashlight to locate the filter compartment.
• If the filter is behind a wall or ceiling return grille, slide the latches and support the door as it opens.
• If the filter is at the indoor air handler, remove the access door or filter rack cover.
On older systems, look for a narrow metal track where the return duct connects to the blower cabinet.
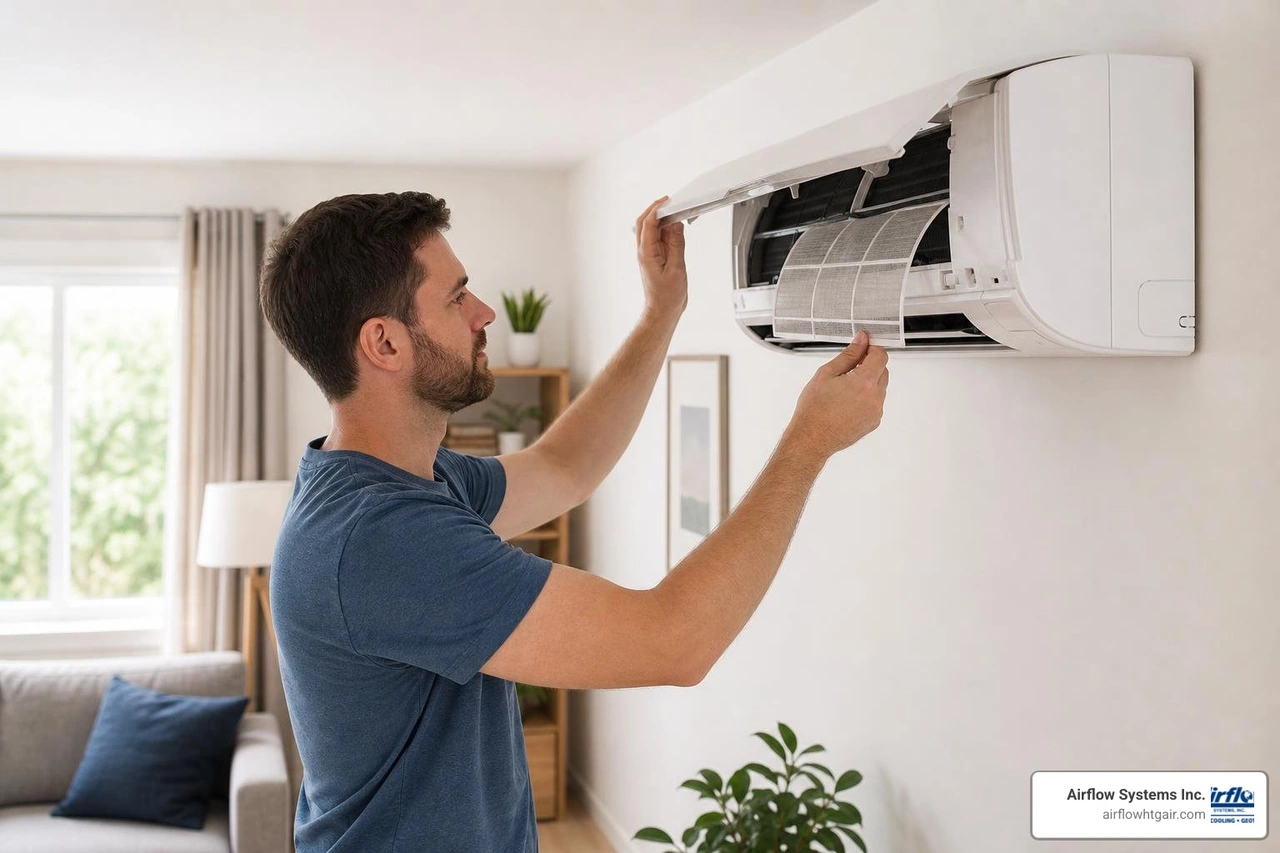
Step 3: Remove the Old Filter and Inspect It
Slide the old filter out carefully. Keep it flat and place it directly into a trash bag so dust, pet hair, and allergens do not shake loose indoors.
Before sealing the bag, inspect the filter:
• The Light Test: Hold the filter up to a light source. If little or no light passes through, it is clogged.
• The Finger Test: Run a gloved finger across the pleats. Heavy gray grime or falling debris means it is overdue.
• Moisture Check: A damp filter or musty odor may point to a drain, coil, or humidity issue that should be checked by a professional.
Step 4: Install the New Filter in the Right Direction
Look at the cardboard frame of the new filter for the arrow marked "Airflow Direction" or "Air Flow."
This arrow must point in the direction air moves through your system:
• For furnace/air handler cabinets: The arrow points toward the blower motor and away from the return duct.
• For wall or ceiling return grilles: The arrow points into the wall or ceiling, away from the room and toward the ductwork.
Slide the filter into place slowly. It should sit flat, fit snugly, and leave no visible gaps around the frame.
Step 5: Close the Panel, Restart the System, and Set a Reminder
Close the cabinet door, access panel, or return grille and fasten all latches. Make sure the panel is seated properly to prevent air leaks.
Turn the thermostat back to "Cool" or "Heat." Listen for smooth airflow. Whistling or rattling may mean the filter is not seated correctly.
Finally, write the date on the filter frame or set a recurring phone reminder so you remember to check it next month.
Choosing the Correct AC Air Filter Size, Type, and MERV Rating
Buying a replacement filter can be confusing because there are many sizes and styles. Focus on three things: size, filter type, and MERV rating. A filter that is the wrong size or too restrictive can reduce airflow. For seasonal preparation tips, read our guide on Preparing Your AC for a Virginia Summer.
How to Choose the Right Size
Air filters are measured by length, width, and depth in inches.
You will usually see two measurements:
1. Nominal Size: The rounded size printed on the filter frame, such as 20" x 25" x 1". This is the size used when buying a replacement.
2. Actual Size: The measured size, which is usually slightly smaller than the nominal size so the filter can slide into the slot.
Do not guess the size. Check the old filter frame or your system manual. If the old filter is missing or unlabeled, measure the filter slot or return grille track for length, width, and depth.
Disposable vs. Washable AC Filters
Disposable filters are most common, but some systems can use washable filters.
• Material — Disposable Pleated Filters: Pleated synthetic fiber or paper — Washable Electrostatic Filters: Woven plastic, aluminum, or polyurethane mesh
• Lifespan — Disposable Pleated Filters: 1 to 3 months, single-use — Washable Electrostatic Filters: Several years, reusable
• Maintenance — Disposable Pleated Filters: Throw away and replace — Washable Electrostatic Filters: Vacuum, wash, and dry monthly
• Filtration Efficiency — Disposable Pleated Filters: Good for fine dust and allergens — Washable Electrostatic Filters: Better for larger dust particles
• Risk of Mold — Disposable Pleated Filters: Low in normal operation — Washable Electrostatic Filters: Higher if reinstalled damp
• Initial Cost — Disposable Pleated Filters: Lower per filter — Washable Electrostatic Filters: Higher upfront purchase
If you choose a washable filter, let it dry completely before reinstalling it. A damp filter can encourage mold growth inside the air handler.
What MERV Rating Means
MERV stands for Minimum Efficiency Reporting Value. It is a 1 to 20 scale that measures how well a filter captures particles between 0.3 and 10 microns.
• MERV 1 to 4: Basic fiberglass filters that capture large particles like lint and heavy dust.
• MERV 5 to 8: Standard pleated filters that work well for many homes and capture pollen, mold spores, and pet dander.
• MERV 9 to 12: Higher-efficiency filters for homes with allergies, asthma concerns, or multiple pets.
• MERV 13 to 16: Dense filters that capture smaller particles but may restrict airflow in some systems.
• MERV 17 to 20: HEPA-level filtration used in specialized settings, not standard residential HVAC systems.
Be careful with high-MERV filters. Denser filters can restrict airflow if the blower motor is not designed for them. Check your system manual or ask an HVAC professional before upgrading above MERV 11.
Common Residential Filter Types
Common filter options include:
• Fiberglass Flat-Panel Filters: Basic equipment protection from large debris.
• Pleated Polyester/Synthetic Filters: A popular choice that offers more surface area for trapping dust.
• Electrostatic Filters: Fibers help attract airborne particles and may be disposable or washable.
• High-Capacity Media Filters: Thick 4-inch to 5-inch filters that hold more dust and last longer.
• HEPA Filters: Very high-efficiency filters that require specialized systems with powerful blowers.
Signs Your AC Filter Needs Replacing and Mistakes to Avoid
Staying on top of filter changes keeps your system running smoothly and helps prevent unexpected breakdowns. To learn how to prepare your entire cooling system for peak summer performance, read our guide on How to Prepare Your AC for Summer.
Signs the Filter Is Dirty, Clogged, or Unsafe to Reuse
Do not wait for your system to stop working before checking your filter. Watch for these warning signs:
• Visible Gray Grime: The filter material has changed from bright white to dark gray.
• Caked Pet Hair and Dust: A fuzzy layer of hair and debris is visible across the pleats.
• Musty Odors: A damp or moldy smell comes from the supply vents when the system starts.
• Tears or Holes: The filter media has pulled away from the frame or has visible rips.
• Debris Falling Off: Dust falls off the filter as you remove it.
• Allergy Flare-Ups: Family members are sneezing or experiencing itchy eyes more often indoors.
What Happens If You Do Not Replace a Dirty Filter?
Leaving a clogged filter in your AC system can trigger several mechanical issues:
1. Restricted Airflow: The blower motor has to work harder to pull air through clogged media.
2. Frozen Evaporator Coil: Without enough warm air moving over the coil, moisture can freeze and block cooling.
3. Short Cycling: The system may turn on and off rapidly, stressing the compressor.
4. Poor Indoor Air Quality: Once overloaded, dust and allergens may bypass the frame and circulate back into your home.
5. System Failure: Overworked components can fail earlier than expected.
Common Filter Replacement Mistakes
Avoid these common mistakes to keep your system running efficiently:
• Installing the Filter Backward: The arrow should point toward the blower motor. A backward filter can collapse or restrict airflow.
• Choosing the Wrong Size: A bent filter or one with gaps allows unfiltered air to bypass the system.
• Washing a Disposable Filter: Paper or fiberglass filters can fall apart or grow mold if wet.
• Installing a Damp Washable Filter: Moisture inside the air handler can encourage mold growth.
• Forgetting Multiple Returns: Replace every filter in homes with more than one return grille.
• Running the System Without a Filter: Dust can coat the evaporator coil and blower wheel.
When a Filter Change Is Not Enough
Changing your filter is an effective maintenance step, but it cannot solve every HVAC problem. If issues continue after installing a fresh, properly sized filter, there may be a deeper system concern. To understand the warning signs of more serious problems, read our guide on AC Repair Red Flags That Mean You Need a New System.
When to Call a Professional Instead
Contact a certified technician if you notice any of the following:
• Hard-to-Reach Filters: Your filter is in an unsafe area, such as a high ceiling or tight crawlspace.
• Persistent Weak Airflow: Airflow remains weak even with a brand-new filter.
• Ice on the Lines: Ice forms on the copper refrigerant lines or indoor air handler cabinet.
• Water Leaks: Water pools near the base of your indoor unit, which may indicate a clogged condensate drain.
• Rapid Clogging: A new filter turns black or clogs within a week.
• Unusual Noises: Squealing, rattling, or grinding comes from the blower area.
How Routine HVAC Maintenance Supports Cleaner Air
A clean filter can only do so much if the rest of the system is dirty. Over time, dust can collect on the blower wheel, evaporator coil, and ductwork.
Professional maintenance supports cleaner, more reliable operation through:
• Coil Cleaning: Helps the indoor evaporator and outdoor condenser coils transfer heat properly.
• Electrical Inspections: Helps identify loose connections or motor concerns.
• Blower Motor Cleaning: Removes dust from fan blades for better airflow.
• Ductwork Inspections: Looks for leaks or gaps that can pull in attic or crawlspace air.
Scheduling seasonal maintenance helps your system run efficiently and keeps your indoor air cleaner. To schedule your seasonal maintenance, visit our HVAC Maintenance Charlottesville VA page.
Conclusion
Taking five minutes to check and replace your AC air filter is one of the easiest ways to protect your home's comfort, maintain system efficiency, and support cleaner indoor air. By learning where your filter is, choosing the correct size and MERV rating, and following the simple steps above, you can handle this essential maintenance task with confidence.
At Airflow Systems Inc., we are proud to be a trusted, family-owned heating and cooling contractor serving homeowners in Charlottesville, VA, and across Central Virginia. Since 1988, our team has helped local homeowners stay comfortable with honest, reliable service and energy-efficient comfort solutions.
If you have checked your filter but are still dealing with weak airflow, uneven cooling, or unusual noises, our friendly team is here to help. Schedule AC service in Charlottesville with us today, and let us help keep your home cool and comfortable all summer long.
Book Expert Service Or Contact Us
Our Service Process
A Hassle-Free Service Experience
01
Consultation & Diagnosis
We start by listening to your needs and performing a thorough diagnosis of your system to recommend the best solution.
02
Transparent Quoting
We provide a clear, upfront estimate with no hidden fees, so you know exactly what to expect.
03
Expert Service & Follow-Up
Our factory-trained technicians complete the work to the highest standards, and we follow up to ensure your complete satisfaction.
testimonials
What Our Customers Are Saying
Our customers consistently praise our exceptional service and attention to detail, making us a trusted choice for all your HVAC needs.
where we operate
Service areas