

Choose an option to see quick actions and get help faster.
.svg)
Planning Your Day: Navigating an HVAC Upgrade During the September Fall-Prep Transition
If you are scheduling a system upgrade before the winter weather arrives, you are likely asking: how long does a typical HVAC installation take in an occupied home? The September fall-prep transition offers the perfect window for this project. The early fall weather is mild enough that your house will not become unbearably hot or freezing cold while the equipment is temporarily offline. However, having technicians working inside your living space still requires some logistical planning.
Most homeowners feel a bit of anxiety about the noise, the disruption to their daily routines, and having a crew moving through their occupied living space. Whether you work from home, have pets that need managing, or just want to know when you can safely schedule a conference call, understanding the hour-by-hour timeline is the key to a stress-free day. The short answer is that most standard residential replacements are completed within a single day. At Airflow Systems, Inc., we find that by partnering with a professional team for your HVAC services, you can expect a streamlined process that respects your time and property. Securing an HVAC replacement during this seasonal window means you can manage the brief disruption now and enjoy reliable, efficient comfort long before the freezing winter temperatures arrive.
The Baseline Expectation: Single-Day vs. Multi-Day Projects
When preparing your household for installation day, it helps to know exactly what kind of timeline you are facing. For a standard split-system replacement—where the indoor air handler or furnace and the outdoor compressor are swapped out in the same locations—the project generally takes between 8 to 14 hours. Our crew will usually arrive first thing in the morning and have your new system blowing conditioned air by the late afternoon or early evening.
However, not every home is a simple swap. Several factors can extend the timeline and turn a single-day job into a multi-day project. If your home requires extensive ductwork modifications, or if you are upgrading to a complex dual-fuel system that requires new gas lines and electrical circuits, the scope of work naturally expands. For instance, when homeowners learn why a compressor failure often means a full system replacement, they sometimes realize their older home needs significant retrofitting to accommodate modern, high-efficiency equipment.
Our team at Airflow Systems, Inc. recently worked with a Charlottesville homeowner who experienced this when they needed to replace an aging upstairs HVAC unit during their fall preparations. Because the indoor unit was located in a restrictive attic space and required some ductwork adjustments to meet modern airflow standards, the replacement took place over two full days. Despite the extended timeline, our staff completed the installation with exceptional courtesy, ensuring the family remained comfortable and informed throughout the multi-day process.
Variables That Impact Your Timeline
To help you gauge whether your project will lean toward the 8-hour mark or stretch into a second day, our technicians typically evaluate these common variables:
• Accessibility of the equipment: A unit located in an open, unfinished basement will be replaced much faster than one tucked into a cramped crawlspace or a sweltering attic.
• Condition of existing infrastructure: If your current ductwork is undersized or leaking, or if your electrical panel requires a new dedicated circuit to handle a modern heat pump, these necessary upgrades add hours to the job.
• Technology transitions: Moving from an old oil furnace to a modern heat pump, or installing a mini-split system with multiple indoor heads, involves entirely different piping and wiring than a like-for-like replacement.
• Standard Split-System Swap — Average Timeline: 8 to 14 Hours — Common Characteristics: Same location, compatible ductwork, no major electrical changes.
• Dual-Fuel Conversion — Average Timeline: 1 to 2 Days — Common Characteristics: Running new fuel lines, upgrading thermostat wiring, modifying plenums.
• Full System with Ductwork — Average Timeline: 2 to 4 Days — Common Characteristics: Tearing out old ducts, fabricating new metal, sealing and insulating.
• Multi-Zone Mini-Split — Average Timeline: 1 to 3 Days — Common Characteristics: Running refrigerant lines through walls to multiple indoor air handlers.
Morning Milestones: Arrival, Staging, and Equipment Removal
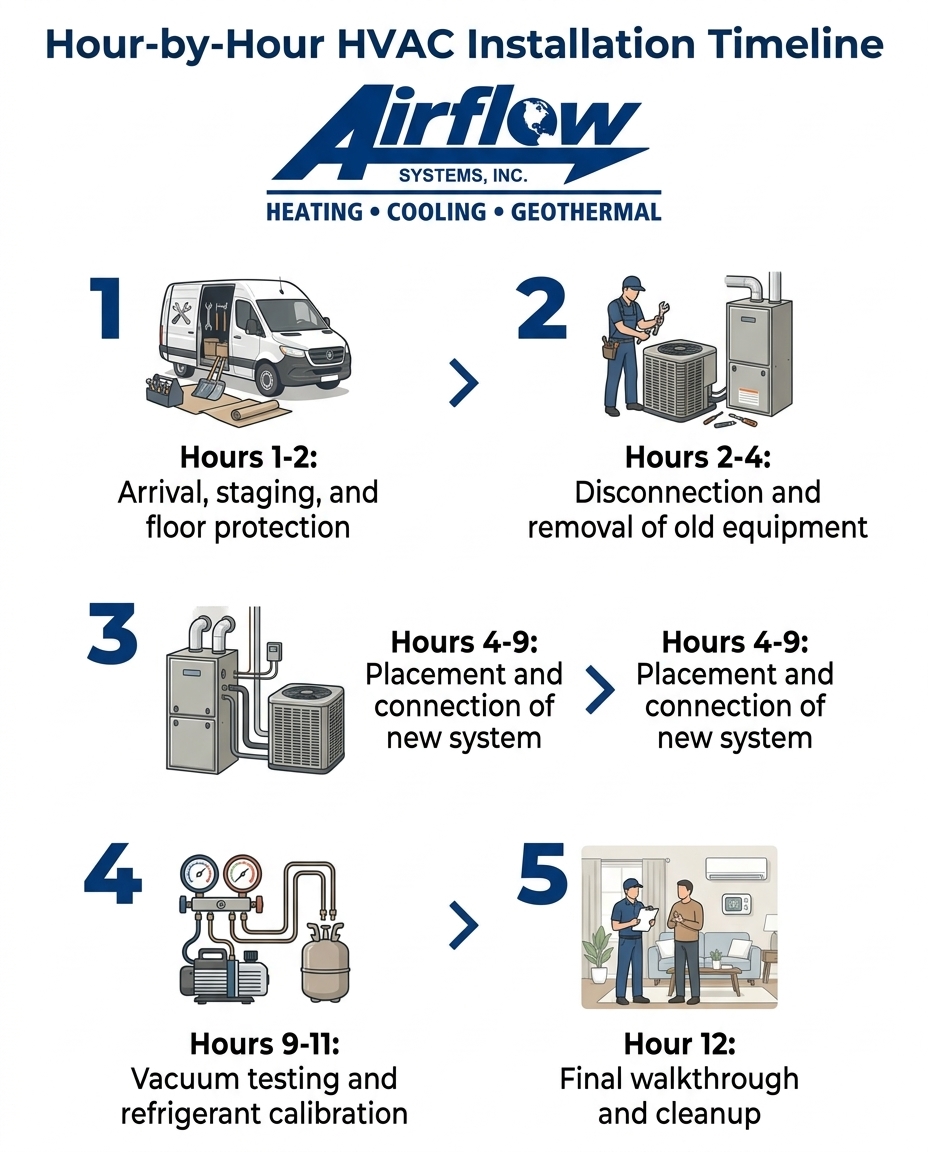
The first two to four hours of installation day set the tone for the entire project. This morning window is highly active, involving significant foot traffic in and out of your home. If you work from home, this is the time to secure yourself in a quiet room away from the main pathways. It is also the most critical time to make sure dogs, cats, and small children are safely secured in a separate area of the house.
1. Arrival and Briefing: Our lead technician will arrive, introduce the crew, and walk through the project scope with you. We will confirm the location of the thermostats, the electrical panel, and the indoor and outdoor units. This is your opportunity to ask any final questions before the heavy work begins.
2. Property Protection and Staging: A hallmark of our professional service is a deep respect for your occupied home. Before a single tool is lifted, the crew will lay down heavy-duty drop cloths, roll out floor protection along all traffic paths, and put on shoe covers. We also set up a staging area—usually in a driveway or garage—to unbox the new equipment and organize materials.
3. Safe Disconnection: The power to your HVAC system is shut off at the breaker panel. Next, the technicians must safely recover the old refrigerant from your existing air conditioner or heat pump. By law, refrigerant cannot be vented into the atmosphere; it must be pumped into specialized recovery cylinders, a process that can take up to an hour depending on the system's size.
4. Physical Removal: Once all electrical, fuel, and refrigerant lines are disconnected, the physical removal of the old equipment begins. This is often one of the most labor-intensive phases. Hauling a heavy, rusted furnace out of a basement or wrestling an old air handler down from an attic requires careful maneuvering to avoid damaging your walls or doorframes.
Mid-Day Operations: Placing and Connecting the New System
Once the old equipment is loaded onto the truck, the mid-day phase begins. This 3-to-5 hour window is the core technical phase of the installation. It is also when you can expect the highest levels of noise. If you are planning your day, schedule your most important phone calls or quiet-time activities outside of this block.
First, the new indoor and outdoor units must be maneuvered into place. New high-efficiency systems are often physically larger than the units built twenty years ago, thanks to larger coils designed to capture more heat. Fitting these larger units into existing utility closets or tight side-yards takes precision. During a recent early fall installation in Charlottesville, our Airflow Systems, Inc. crew needed to fit a new heat pump into a very tight space. Despite the close quarters, we maneuvered the heavy equipment safely and installed it perfectly, resulting in a system that runs highly efficiently and much quieter than the old unit.
After the equipment is set, the complex connection work begins. This is where the noise of power tools and sheet metal work becomes noticeable. The technicians must fabricate and adapt the sheet metal plenum—the large duct that connects your new unit to the existing ductwork in your home. You will likely hear drills, metal shears, and hammering as we ensure an airtight seal. Whether our team is performing a standard furnace installation or setting up a complex hybrid system, this custom metalwork is essential to prevent conditioned air from leaking into your basement or attic.
Simultaneously, another technician will be working outside to braze the copper refrigerant lines. Brazing involves using a high-temperature torch to weld the copper pipes together, ensuring they can handle the immense pressure of modern refrigerants without leaking. New electrical whips and disconnect boxes are also wired in during this phase, ensuring the new system meets all current safety codes.
The Critical Final Hours: Calibration, Testing, and Commissioning
By the late afternoon, the physical installation of the equipment is usually complete. The units are in place, the metal is sealed, and the wires are connected. However, the system is not ready to turn on just yet. The final one to two hours of the timeline are dedicated to calibration, testing, and commissioning. This phase is absolutely crucial and should never be rushed, even when the job looks visually "done."
The Vacuum Test: Before any new refrigerant can be released into the copper lines, the technicians must hook up a specialized vacuum pump. This pump removes all air and microscopic moisture from the piping. If even a tiny amount of moisture is left inside the lines, it can mix with the refrigerant oil to create a corrosive acid that will eventually destroy the new compressor. Pulling a proper vacuum takes time—often 45 minutes to an hour on its own.
Refrigerant Charging and Airflow Calibration: Once the vacuum test is passed, the refrigerant is released, and the system is powered on for the first time. The technicians will then spend significant time measuring the subcooling and superheat levels to ensure the exact right amount of refrigerant is flowing through the system. We also perform meticulous airflow and load testing according to strict Air Conditioning Contractors of America (ACCA) standards.
This calibration is something we prioritize heavily at Airflow Systems, Inc. With the unique climate of Charlottesville VA, the early fall humidity requires the new system to be carefully calibrated for proper dehumidification before the winter heating season begins. If the blower motor speed is set too high, the system will cool the house too quickly without removing the sticky moisture from the air. Taking the time to dial in these settings ensures that when you invest in a heat pump installation, you are getting maximum comfort and efficiency. Finally, our crew will walk you through the new thermostat, explain the filter replacement schedule, and perform a spotless cleanup of the work areas.
Frequently Asked Questions About HVAC Installations in Occupied Homes
Can you stay in your house during HVAC installation?
Yes, homeowners typically stay home during the entire installation process. It is highly recommended to stay in rooms away from the immediate work areas, such as the utility room, basement, or attic access. This gives the technicians the space they need to work safely while keeping you insulated from the heaviest noise and foot traffic.
What happens during HVAC installation?
The installation day follows a structured, step-by-step process designed for safety and efficiency. First, the crew arrives, stages their equipment, and protects your flooring. Next, they safely disconnect and remove your old, failing equipment. The mid-day hours are spent placing the new units, fabricating custom sheet metal connections, and brazing copper lines. Finally, the system undergoes rigorous vacuum testing, refrigerant calibration, and a complete cleanup before a final walkthrough with you.
How messy is an HVAC installation?
While removing old, dusty equipment can inherently generate some debris, a professional installation is surprisingly clean. Expert teams use heavy-duty drop cloths, wear protective shoe covers, and seal off work zones to protect your home. Some minor dust from cutting sheet metal or adapting duct connections is normal, but the crew will perform a full vacuum cleanup of the workspace before they leave your property.
How long does it take to install a whole house HVAC system?
A standard whole-house HVAC system replacement generally takes between 8 and 14 hours, meaning it is usually completed within a single day. However, if your home requires extensive modifications to the ductwork, upgraded electrical panels, or a transition to a dual-fuel setup, the project can extend to two or three days. Our technicians will provide a precise timeline during your initial consultation.
Will we lose power or water during the process?
You will not lose general power or water throughout your home during an HVAC installation. The technicians will only turn off the electricity at the specific breaker switches dedicated to your heating and cooling equipment. The rest of your home's lighting, outlets, appliances, and plumbing will remain fully functional throughout the entire day.
Ensuring a Smooth Transition for Your Home's Climate
Knowing exactly how long a typical HVAC installation takes in an occupied home completely removes the stress and uncertainty of upgrade day. When you understand the hour-by-hour milestones—from the heavy foot traffic of the morning removal to the quiet, meticulous calibration of the late afternoon—you can confidently plan your daily routines, manage your pets, and schedule your work-from-home meetings without interruption. While the final stages of vacuum testing and airflow adjustment require patience, that dedicated time ensures your new equipment will handle the unpredictable seasonal shifts with perfect efficiency. If you are ready to explore your options and want to discuss how the team at Airflow Systems, Inc. can seamlessly integrate a new system into your specific home layout, reach out to schedule a thorough assessment today.
Book Expert Service Or Contact Us
Our Service Process
A Hassle-Free Service Experience
01
Consultation & Diagnosis
We start by listening to your needs and performing a thorough diagnosis of your system to recommend the best solution.
02
Transparent Quoting
We provide a clear, upfront estimate with no hidden fees, so you know exactly what to expect.
03
Expert Service & Follow-Up
Our factory-trained technicians complete the work to the highest standards, and we follow up to ensure your complete satisfaction.
testimonials
What Our Customers Are Saying
Our customers consistently praise our exceptional service and attention to detail, making us a trusted choice for all your HVAC needs.
where we operate
Service areas